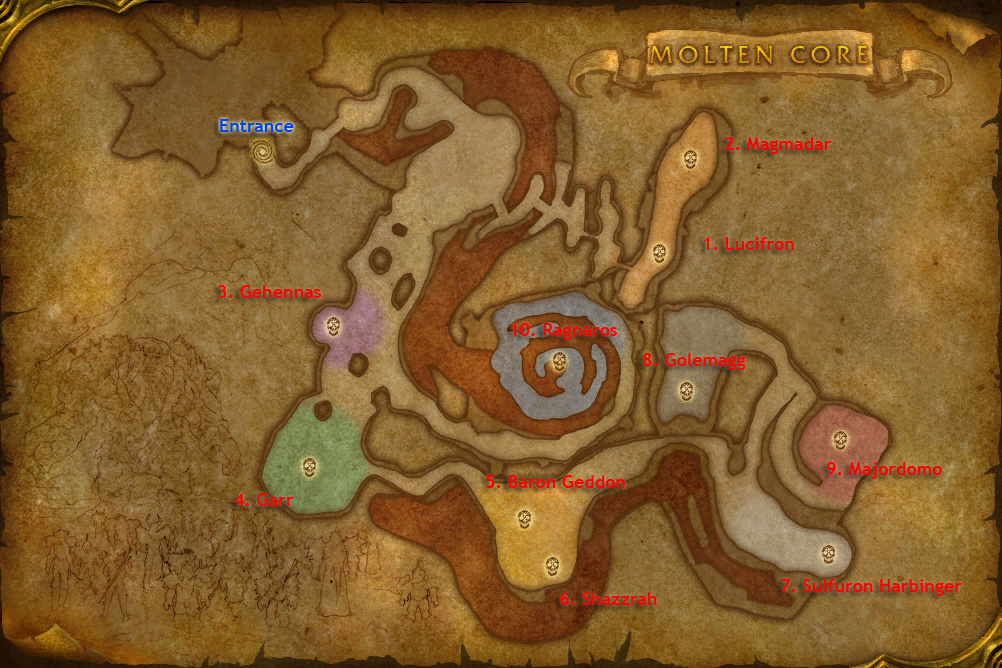
Molten Core Raid Guide
Contents
1.0 Introduction
2.0 First Steps
1.0 Introduction
It took me a while before I found a few decent sources that gave me a thorough guide to retail MC. I know it isn’t necessary but I thought it would be a good idea to grab everything together, remove some of the useless information and make a guide for the new players that will be joining us and the old players whose memory of the raid is starting to fade (very much like mine), just so it’s more easily accessible, relevant and can be used as a reference.
Now, this guide will be highlighting and taking you through the strategies required to run MC in retail. Most, if not all, of this information should be/will be relevant for Kronos, as Kronos aims to provide a close-to-retail experience. However, there might be some tactics or strategies that will either not be required or do not work because the Molten Core on Kronos might differ slightly. However it has been made assured that it won’t, so please, take an hour, grab a coffee and read on to your hearts content.
This guide just details the basic strategies and puts everything into one place. Reading this will prepare you a little for what to expect in Molten Core, but it will not make you an expert! No amount of reading or guides can make up the experience of at least one full Molten Core run. Nonetheless reading guides are required if you wish to run raid content and not become a burden. Many raid/group leaders will expect you to know the basics already and will not go out there way to explain everything whilst organising 38 other people. So do your leaders a favour and be prepared!
If you have any better/differing strategies, or you feel something in this guide is wrong, please let us know in the comments so we, as a community, can discuss it. I will then update this post if better strategies or correct information has been revealed.
I will also create and upload guides for all the other raid instances when I have the time. They will be linked here.
A PDF copy of this guide is available here. Courtesy of none other then Brekiant
2.0 First Steps
Before you enter or start thinking about partaking in any raid, there is a little thought and preparation required. As with most vanilla raids (exception being Zul’Gurub), an attunement is required to give you access to the raid and to provide an easy teleport to the front door. With MC in particular there is some necessary FR required, how much and where from will be talked about in Section 2.3. Lastly there are some consumables that you might consider taking, however some experienced players might argue it isn’t necessary for MC (apart from bandages!), as the raid is quite easy compared to the others of vanilla.
2.1 Molten Core Attunement
The attunement is acquired through a quest called Attunement to the Core.
http://www.wowwiki.com/Quest:Attunement_to_the_Core
This is obtained by speaking to the blood elf Lothos Riftwaker outside of Blackrock Depths (BRD). Once completed, Lothos Riftwaker can teleport you directly to the entrance of MC, which is located in the dungeon of BRD.
It is not a particularly difficult quest to do; you can complete it while attempting to clear BRD. You can receive this quest at level 55. To complete it you need to venture to the Molten Core entry portal in BRD and recover a Core Fragment by looting a rock just outside the portal. Return to Lothos Riftwaker in Blackrock Mountain when you have recovered the Core Fragment and that’s it, you are officially attuned to the raid.
2.2 Gear
So what type of gear should you be looking to take? A good benchmark is that your gear should be your class's blue set or better. Most of the class sets are adequate but not great. To determine what
pre-raid gear you should be looking at check out any class pre-raid guide for the Best in Slot (BiS) items. BiS gear can be found in any of the "Big 4" instances: Stratholme, Scholomance, Blackrock Spire, or Dire Maul, and once they are released; Zul'Gurub and Ruins of Ahn'Qiraj.
FRis only useful in a couple of fights, but everyone needs it. FR is detailed below in Section 2.3. As much as possible, try to make a FR set that doesn't sacrifice all stats
(In other words, don't wear all greens of +FR, although it may be necessary in a couple of slots)
2.3 Fire Resistance
When you get closer to raiding MC you are going to have start thinking about obtaining pieces of Fire Resistance (FR) gear to wear or take along with you in your bags and swap over on some bosses/mobs. The following stats are required.
Unbuffed means your base FR stat you receive from gear, without any buffs from Paladin’s Aura, Shaman’s Totem, Druids Mark or Consumables.
Here is a quick list of items that provide +FR that you might what to think of obtaining: http://brafish.tripod.com/FR.html
2.4 Hydraxian Waterlords
Hydraxian Waterlords is the faction opposing the forces of Molten Core. There is a decent quest chain (8 people in the raid are required to have it completed if you want to kill certain boss) off the coast of Azshara (79.73). It starts off with Duke Hydraxis providing you with 2 quests:
Quest 1 - Poisoned Water: Kill water elementals in EPL
Once this is done, visit the Duke a second time and they will have a third quest:
Quest 3 - Eye of the Emberseer: Collect the Eye of the Emberseer from Pyroguard Emberseer. The first main boss in UBRS. This CAN be done in a raid.
Return to the Duke and he will give you quest number four:
Quest 4 – The Molten Core: Kill one Ancient Core Hound, one Molten Giant, one Firelord, and one Lava Surger. Easy enough to do on an MC raid.
Once this quest is done the Duke will give you a quest to reach Honored with the Hydraxian Waterlords faction. Elementals in Silithus, the Burning Steppes, and everything in MC will give reputation.
Once Honored, the Duke will give you quest number six:
Quest 6 – Hands of the Enemy: Collect the Hands of Shazzrah, Lucifron, Gehennas, and Sulfuron. Now you get to kill these bosses. Have fun. http://www.wowhead.com/quest=6824/hands-of-the-enemy
You class will have its own specific group of consumables that will be taken along to any raid. This list will detail the consumables that any class should think of taking. A full list of consumables for every class will be extremely long. Before you enter any raid make sure you know what is expected of your class and what consumables to take! There are plenty of class specific guides for raiding on the net. It is very likely someone will be kind enough to make a class raiding guide for the Kronos forums.
Everyone in the raid should have 300 FR buffed and a stack or more of bandages. Everyone should have potions:
Other consumables worth considering – These can be annoying to farm but can be an awesome asset:
A full list of all consumables that fall under the categories above can be found here: http://wiki.theamazonbasin.com/index.php/WoW_Raid_Consumables
2.6 Raid Group Composition
You will need to start thinking of who to take along in this raid. A balanced raid group will ideally have 5 of each class available to you, for a total of 40. There's some room to shuffle people around based on availability and spec, but try to stick to that as a general formula.
With MC being quite easy compared to other raids, I for one welcome the use of off-specs that are not labelled as ‘cookie cutter’. You might find some raid groups are not as welcoming to this idea for various reasons (due to efficiency, gear or achieving certain goals). But it is very possible to have a few people run a spec they are most comfortable with and will have the most fun with, and still easily finish this raid. However, the main issue with taking off-spec’s is gear allocation. You will find, especially the first couple of runs ever attempted by a new guild, any off-spec will not receive as much, or any, gear love as someone who rolled an efficient, raid purpose, spec. To expect otherwise is naïve and if you disagree with this or think of it unfair then any trouble or anguish you experience will be your own doing, and rightly so. Nonetheless, please play your class how you want to play it.
Once you have a good roster full or raiding peeps. Get all of these people attuned and geared, then find a time. You'll need several hours where everyone can be there to really progress at all; although the raid timer system means you don't need to run the entire instance in one sitting, you'll incur a substantial penalty by reclearing to whatever boss you left off on. Be sure to have a group or so in reserve in case of no-show’s, it’s a bit unfair to this reserve group, but they might get a chance nonetheless.
3.0 Trash Mobs
+ Means info on the mob.
- Means what this mob does during combat.
= The strategy involved in killing it/dealing with it.
3.1 Molten Giant
+Does NOT respawn back.
-Single target knockback.
-Area of Effect (AoE) stomp up to 8 targets
=Try and tank against a wall
=DPS after 2-3 sunders are up
3.2 Molten Destroyer
+Does NOT respawn back.
+Level 63.
+Bigger and Meaner version of the Molten Giant
-Single target attack, and attacks quickly.
-Hits tank for 700 - 800 damage.
-Massive trample - 1000 damage AoE attack
-Smash Attack - 1000 - 1100 damage against a tank.
-Knock down - Knocks a target down for a few seconds.
=When paired with a Molten Giant, kill Giant first, then Destroyer.
=Keep the Destroyer away from the main group.
=Newer groups that can't take the damage and afford the healing should do ranged damage only and keep the melee out of the fight.
3.3 Firelord
+150 minute static respawn.
+Immune to crowd control.
-Does 500 fire damage to a target.
-Can debuff somebody to increase fire damage taken.
-Ability that hits for 4000 damage + DoT which does 250 damage every 2 seconds + Silences.
-Summons Lava Spawns, which does ranged damage for 600, if left up, the spawn will split into 2, etc...
=DPS once tank has 2-3 sunders up
=Kill Lava Spawns as soon as they come out.
=Paladins and Priests dispel DoTS ASAP.
=Mages use Blizzard on the Lava Spawns
=If fighting 2 Firelords, get them together with the Lava Spawns and Blizzard AoE
Once you have killed a few Firelords it becomes very routine and boring.
3.3 Ancient Core Hounds
+18 minute respawn.
+Patroller.
+Immune to crowd control.
+They stop respawning once Magmadar dies.
-Frontal 180 degree bite attack.
-Long range Fire AoE that does 800 damage.
-In addition to this it will have one of six random AoE debuffs :
Ground Stomp - 5 second stun.
Ancient Dread - Slow spell casting and melee speed by 50% (Curse, can be removed)
Ancient Despair - 3 seconds of confusion (Magic, can be removed, although generally no one resists to dispel it.)
200 Fire resist Debuff (Magic, can be removed)
Withering Heat - Maximum hp reduced by 15% for 15 minutes (Magic, can be removed)
50% less int/spirit - (Magic, can be removed)
=Have one tank at the front, everybody else stays behind.
=Only AoE debuff worth dispelling is the 200 FR debuff, which can greatly increase the damge taken from his fire AoE.
=You should have another tank (with FR) ready to tank the dog. Since some of its abilities (like the fear and stun) cause the tank to temporarily lose aggro.
=Priests and Paladins must keep on eye on the type of debuffs and dispel when necessary.
Special Note for Ranged DPS: If you have points in any talents that increase the maximum range of your spells or attacks you may be able to avoid the AoE debuff. After the MT has established aggro, simply back up as far away from the hound as you can. Be careful doing this. If the MT is afflicted with Ancient Despair, the hound will run straight for you.
3.5 Core Hound Packs
+60 minute respawn.
+There are 5 packs of 5 leading up to Magmadar.
+Each hound in the pack must all be killed at the same time (within 10 seconds apart at the most), or they will be revived back!
-Hits tanks for about 300-400 damage.
-Frontal attack, which puts a DoT on target that does 50 damage every second for 30 seconds. This DoT can be stacked a total of 10 times for a total of 15,000 damage over 30 seconds.
=Get at least one Tank per hound and have all the tanks bunch them up. Try to turn so that the dog's head is facing outwards. This way, as few tanks as possible will likely be hit by the melee dot.
=Tanks should get the hounds to only face them, and away from the rest, to minimise melee DoT.
=DPS your hounds when 2 sunders are up. Make sure all 5 are up before using AoE attacks.
=Any person that does single target damage is also constantly looking for the dog with the highest HP to target.
=Healers are to remember to continue healing the tanks after combat, those stackable DoT's continue doing a lot of damage after the battle.
Be warned: If you pull too fast, i.e. having a dead pack on the ground while the next pull is coming in, the dead bodies can be reignited from the current aggroed pack!
3.6 Lava Surgers
+28 minute respawn.
+Stop respawning once Garr dies.
-Surge: Charges toward the player on his threat list who is farthest away for 1000 damage and will deal 100 damage to all players in melee range of that player and knocking them back.
=Banishable
=Tank facing away from the raid
=Tank and Spank – very easy fight.
3.7 Lava Annihilator
+120 minute respawn.
+Shares spawn points with Firelords
-Hits a tank for 900 - 1100 damage.
-Can be taunted, but won't hold aggro for long, randomly attacks targets which have generated threat
=Best way to fight these is EVERYONE stands at their feet and DPS it down. With MT establishing aggro before everyone engages.
=Tank can alternate between Taunt and Mocking Blow (note the cooldowns (CD) though)
3.8 Flame Imps
+7 minute respawn.
-Hits tanks for about 200.
-Small AoE fire attack that stacks up quite quickly.
=Warriors fight for aggro.
=Mages use blizzard, if they get aggro, use frost nova, then more AoEs.
=Move on quickly because these guys respawn fast!
3.9 Lava Packs
Consist of Lava Elements, Flamewalkers, and Firesworns. These you will encounter after Garr's lair when clearing to Baron/Shazz. When you pull these you need to banish the elemental and have 2 tanks pickup the Flamewalker and Firesworn. DPS them down and then kill the elementals. They have a very nasty AoE and some fun debuffs. FR is very much needed for Lava Packs.
These are probably the hardest Trash Mobs in MC. They can wipe a raid easily if they are not controlled right. So it is important to have some distance between the tanks and warlocks to the rest of the raid (at least 20 yards). Let the tanks get their targets, and face them away from raid, and only then start DPSing.
It is very important that the Firewalker and Flameguard AoEs not be allowed to overlap. The main tank is usually assigned to hold the Flameguard facing away and some distance beyond the party, while the off-tank holds the Firewalker.
The Firewalker is killed first, followed by the Flameguard, and finally each of the banished Lava Reavers or Lava Elementals. It is helpful to delay the banishing until 5-8 seconds after engaging the pack, so the reaver/elemental tanks have time to get aggro on their adds. If you fail to do this, the adds will come unsummoned and rampage through the raid until the tank grabs them again.
+120 minute respawn.
+4 different mob types.
+2 different groups:
+Level 63.
+Has increased Resistances.
-Hits a tank for 600 - 800 damage.
-Cleaves for 600 - 700 damage.
=Banishable. Usually banished first while group focuses on the Flameguard and Firewalker.
=Their cleave is a chain cleave, which means it will hit anyone within appx. 5 yards of anyone else cleaved. As such, the melee DPS needs to be as far away from the tank as possible while DPSing these.
3.9.2 Lava Elemental
-Hits a tank for 600 - 800 damage.
-Strike - hits tank for 800 - 1000 damage
-Pyroclast Barrage - Deals 1500 fire damage over 6 seconds and stuns the target. This hits in a cone in front of the mob and is not dispellable
=Banishable. Usually banished first while group focuses on the Flameguard and Firewalker.
=Tank these while facing away from the group
=FR gear is advised when fighting these as Pyroclast Barrage and be devastating
3.9.3 Flameguard
-Continuous small AoE damage attack that also debuffs armour
-“Flamethrower" AoE that extends in front of it.
=Off Tanks should face this mob away from the raid
=Kill this mob after the Firewalker has been killed
3.9.4 Firewalker
+Most dangerous of the 4.
-Has a fire resist debuff.
-Fireball – hits for 3000 damage, can potentially cast very rapidly.
=Main Tank will aggro this mob
=DPS will target and kill this mob first. Warlocks will target this mob after they have banished their assigned elemental.
4.0 Boss Fights
This will be the first boss you encounter in MC. Popular opinion states that he is the second easiest boss in the raid. There is quite a bit of coordination required due to healing from AoE attacks, 2 different dispel types and 2 Flamewalker Protectors that have a mind control ability.
4.1.1 Attacks and Abilities
- Impending Doom
- Lucifron's Curse
- Shadow Shock
Flamewaker Protectors
NOTE: It is believed that if you pull the Flamewakers from Line-of-Sight of Lucifron, there will be no mind-control. Blizzard designed the battle area with this in mind, **hint: notice the small dug cave in the room.**
4.1.2 Strategies
In most cases, raids will first dispatch the first Core Hound Pack to give some room for the pullers and the main tank. It is important when Lucifron is pulled so that he does not come near the main raid group or there could be an instantaneous wipe. His guards have the ability to mind control, so it is sometimes easier to have one or two dummies move ahead of the main tank to suck up the mind control. Additionally, no one can move near the tunnel to the west, or the imps and surgers inside could chain aggro and wipe the raid.
Generally, two hunters will use one of their insta-cast shots to pull the Flamewalker Protectors, while the Main Tank must run up, tag, and pull Lucifron in the opposite direction of his guards. Generally the back cove is where the guards are pulled, while Lucifron is taken to another alcove on the east, far from the main raid. Each of the guards must then be picked up by two off tanks and dispatched accordingly before Lucifron is targeted.
Mages will not be contributing any large part of the DPS in this fight as they will be tied up with removing the curse that Lucifron casts on the raid every 15 seconds. Priests (and Paladins if Alliance) will also be tied up dispelling the Impending Doom debuff from healers, and especially the main tanks, and whoever becomes mind controlled. The core DPS for this fight therefore falls upon the rogues, hunters, and warlocks.
Once the two guards are defeated, all DPS will shift to Lucifron. Usually around 20-25%, it is safe for some of the mages to begin casting their nukes, depending on their mana and how quickly they decurse the raid.
Luci's debuffs have a range of 40 yards. It is possible for every healer (except the MT-decurser), and properly spec'ed hunters to stay out of Lucifron's curse-range, so with a good group you can minimize every curse-wave to about 10 raid members (melees). This makes the fight much easier and allows the mages to do damage too. You can also choose to keep only necessary players within the radius (healers, decursers, dispellers, tanks), and hold back the DPS players out of the range until Luci's mana is depleted. It takes a few minutes, but it saves the trouble of nearly wiping when the entire raid is bing hit by the curses and magic effects. It’s good to note that any ranged DPS that can attack at 41 yards through talents can exceed Luci's range and still DPS him down. They just have to be at their maximum range.
4.2 Magmadar
Favored among Ragnaros's pets, Mag is protected by the Flamewaker Lucifron and surrounded by vicious packs of ravenous hounds. He is the second raid boss encounter of the Molten Core and is guarding the Rune of Kress. This rune will need to be doused by a Quintessence (see Section 2.4) if you wish to summon Majordomo Executus.
4.2.1 Attacks and Abilities
- Magma Spit
- Lava Breath
- Panic (AoE Fear)
- Lava Bomb
- Frenzy
- Immolation
4.2.2 Strategies
The main tank should pull Mag so that he is facing towards the main group of healers, hunters, and nukers. Maghas a frontal attack that should only hit the MT. To accomplish this, once the MT has aggro, the rest of the melee and the melee healers run around BEHIND Mag. Casters and the rest of the healers will be standing in front of Mag, but out of range of his frontal/fear attack. Here is the positioning:

T=Tank, M=Melee, N=Nukers, H=Healers. The green circle is Mag's fear range
Hunters must use Tranquilizing Shot (a learned skill that comes from a tome with a 100% drop rate from Lucifron) when he frenzies, they must pay attention to the order they use it in and whether it is a hit or a miss. The first few Magmadar fights will be tricky, since Tranq shot will often miss. Once a few hunters have it, however, they can set up a rotation so that if one person misses, someone else can back him up. All hunters should make macros which will say when you have casted tranq shot, and will also let the raid know if you have missed. During the first few fights when we only have one or 2 tranq shots, healers will have to pay special attention to when Tranq shot misses, since the MT will then require mad healing to stay alive.
Melee DPS should come in on the sides and behind Mag. They need to be sure to avoid the Immolate, by staying at max melee range, and avoid any ‘globs’. They will be responsible for removing themselves from battle and bandaging since they will be out of range of the healers. If Fear Ward is not available, the warrior can "stance dance" in and out of Berserker Stance in order to use Berserker's Rage about every 30 seconds to avoid being feared. It is important that the main tank doesn't get feared — otherwise, while aggro will no longer be lost, Magmadar will follow the fleeing tank and the healers will suddenly be in range of him, and it is unlikely that the raid group will recover.
A guild new to Magmadar may wish to have 2 groups of MT healers, only one of which is on the MT at a time. If the group that is actually healing the MT gets feared, the other group rushes in. My guild used this method until the healers became better at staying just out of AoE fear range. We found that 2–3 healers per group is enough so long as the hunters are quick with the tranq shots.
The BoJ setup method: The easiest way to control the encounter is having healers and ranged DPS classes outside the fear range from the start. The trick to this is setting up the pull. Have your main tank walk up to maximum bow range from Mag and stay there. Now have your healers adjust position so they are just in healing range of the main tank. Healing range is 40 yards, and AoE fear range is 30 yards, so this should be easy. (Hint: if you can cast dispel or cleanse on the main tank, you are too close.) Hunters and mages with extended range now move to the same radius as the healers, but may need to move in a little to get range once the encounter starts. The healers and ranged DPS should be in a semi-circle and spread out to reduce the chances of a multiple people being affected by a Magma spit puddle. Once the healers and ranged DPS are in position, the main tank pulls Magmadar with a bow/gun.
So, stay out of the fire globs that are put down by Magma Spit. Use Tranq shot to keep Magmadar calm, and have the MT stance dance to avoid being feared. Other than that, it's just DPS him down!
Contents
1.0 Introduction
2.0 First Steps
2.1 Molten Core Attunement
2.2 Gear
2.3 Fire Resistance
2.4 Hydraxian Waterlords
2.5 Consumables
2.6 Raid Group Composition
3.0 Trash Mobs3.1 Molten Giant
3.2 Molten Destroyer
3.3 Firelords
3.4 Ancient Core Hound
3.5 Core Hound Pack
3.6 Lava Surgers
3.7 Lava Annihilator
3.4 Ancient Core Hound
3.5 Core Hound Pack
3.6 Lava Surgers
3.7 Lava Annihilator
3.8 Flame Imps
3.9 Lava Packs
3.9 Lava Packs
3.9.1 Lava Reaver
3.9.2 Lava Elemental
3.9.3 Flameguard
3.9.4 Firewalker
4.0 Boss Fights3.9.2 Lava Elemental
3.9.3 Flameguard
3.9.4 Firewalker
4.1 Lucifron
4.1.1 Attacks and Abilities
4.1.2 Strategies
4.1.2 Strategies
4.2 Magmadar
4.2.1 Attacks and Abilities
4.2.2 Strategies
4.2.2 Strategies
4.3 Gehennas
4.3.1 Attacks and Abilities
4.3.2 Strategies
4.3.2 Strategies
4.4 Garr
4.4.1 Attacks and Abilities
4.4.2 Strategies
4.4.2 Strategies
4.5 Baron Geddon
4.5.1 Attacks and Abilities
4.5.2 Strategies
4.5.2 Strategies
4.6 Shazzrah
4.6.1 Attacks and Abilities
4.6.2 Strategies
4.6.2 Strategies
4.7 Sulfuron Harbringer
4.7.1 Attacks and Abilities
4.7.2 Strategies
4.7.2 Strategies
4.8 Golemagg the Incinerator
4.8.1 Attacks and Abilities
4.8.2 Strategies
4.8.2 Strategies
4.9 Majordomo Executus
4.9.1 Attacks and Abilities
4.9.2 Strategies
4.9.2 Strategies
4.10 Ragnaros
4.10.1 Attacks and Abilities
4.10.2 Preperation and Setup
4.10.3 Strategies
5.0 End Statement4.10.2 Preperation and Setup
4.10.3 Strategies
1.0 Introduction
It took me a while before I found a few decent sources that gave me a thorough guide to retail MC. I know it isn’t necessary but I thought it would be a good idea to grab everything together, remove some of the useless information and make a guide for the new players that will be joining us and the old players whose memory of the raid is starting to fade (very much like mine), just so it’s more easily accessible, relevant and can be used as a reference.
Now, this guide will be highlighting and taking you through the strategies required to run MC in retail. Most, if not all, of this information should be/will be relevant for Kronos, as Kronos aims to provide a close-to-retail experience. However, there might be some tactics or strategies that will either not be required or do not work because the Molten Core on Kronos might differ slightly. However it has been made assured that it won’t, so please, take an hour, grab a coffee and read on to your hearts content.
This guide just details the basic strategies and puts everything into one place. Reading this will prepare you a little for what to expect in Molten Core, but it will not make you an expert! No amount of reading or guides can make up the experience of at least one full Molten Core run. Nonetheless reading guides are required if you wish to run raid content and not become a burden. Many raid/group leaders will expect you to know the basics already and will not go out there way to explain everything whilst organising 38 other people. So do your leaders a favour and be prepared!
If you have any better/differing strategies, or you feel something in this guide is wrong, please let us know in the comments so we, as a community, can discuss it. I will then update this post if better strategies or correct information has been revealed.
I will also create and upload guides for all the other raid instances when I have the time. They will be linked here.
A PDF copy of this guide is available here. Courtesy of none other then Brekiant
2.0 First Steps
Before you enter or start thinking about partaking in any raid, there is a little thought and preparation required. As with most vanilla raids (exception being Zul’Gurub), an attunement is required to give you access to the raid and to provide an easy teleport to the front door. With MC in particular there is some necessary FR required, how much and where from will be talked about in Section 2.3. Lastly there are some consumables that you might consider taking, however some experienced players might argue it isn’t necessary for MC (apart from bandages!), as the raid is quite easy compared to the others of vanilla.
2.1 Molten Core Attunement
The attunement is acquired through a quest called Attunement to the Core.
http://www.wowwiki.com/Quest:Attunement_to_the_Core
This is obtained by speaking to the blood elf Lothos Riftwaker outside of Blackrock Depths (BRD). Once completed, Lothos Riftwaker can teleport you directly to the entrance of MC, which is located in the dungeon of BRD.
It is not a particularly difficult quest to do; you can complete it while attempting to clear BRD. You can receive this quest at level 55. To complete it you need to venture to the Molten Core entry portal in BRD and recover a Core Fragment by looting a rock just outside the portal. Return to Lothos Riftwaker in Blackrock Mountain when you have recovered the Core Fragment and that’s it, you are officially attuned to the raid.
2.2 Gear
So what type of gear should you be looking to take? A good benchmark is that your gear should be your class's blue set or better. Most of the class sets are adequate but not great. To determine what
pre-raid gear you should be looking at check out any class pre-raid guide for the Best in Slot (BiS) items. BiS gear can be found in any of the "Big 4" instances: Stratholme, Scholomance, Blackrock Spire, or Dire Maul, and once they are released; Zul'Gurub and Ruins of Ahn'Qiraj.
FRis only useful in a couple of fights, but everyone needs it. FR is detailed below in Section 2.3. As much as possible, try to make a FR set that doesn't sacrifice all stats
(In other words, don't wear all greens of +FR, although it may be necessary in a couple of slots)
2.3 Fire Resistance
When you get closer to raiding MC you are going to have start thinking about obtaining pieces of Fire Resistance (FR) gear to wear or take along with you in your bags and swap over on some bosses/mobs. The following stats are required.
- For Melee: 150-200 unbuffed
- For Casters: 100-150 unbuffed
- Hunters can get away with 0 FR unbuffed. However, I advise going in with around 75-100
- For Casters: 100-150 unbuffed
- Hunters can get away with 0 FR unbuffed. However, I advise going in with around 75-100
Unbuffed means your base FR stat you receive from gear, without any buffs from Paladin’s Aura, Shaman’s Totem, Druids Mark or Consumables.
Here is a quick list of items that provide +FR that you might what to think of obtaining: http://brafish.tripod.com/FR.html
2.4 Hydraxian Waterlords
Quest 1 - Poisoned Water: Kill water elementals in EPL
Quest 2 - Stormers and Rumblers: Kill wind and rock elementals in Silithus
Once this is done, visit the Duke a second time and they will have a third quest:
Quest 3 - Eye of the Emberseer: Collect the Eye of the Emberseer from Pyroguard Emberseer. The first main boss in UBRS. This CAN be done in a raid.
Return to the Duke and he will give you quest number four:
Quest 4 – The Molten Core: Kill one Ancient Core Hound, one Molten Giant, one Firelord, and one Lava Surger. Easy enough to do on an MC raid.
Once this quest is done the Duke will give you a quest to reach Honored with the Hydraxian Waterlords faction. Elementals in Silithus, the Burning Steppes, and everything in MC will give reputation.
Once Honored, the Duke will give you quest number six:
Quest 6 – Hands of the Enemy: Collect the Hands of Shazzrah, Lucifron, Gehennas, and Sulfuron. Now you get to kill these bosses. Have fun. http://www.wowhead.com/quest=6824/hands-of-the-enemy
2.5 Consumables
You class will have its own specific group of consumables that will be taken along to any raid. This list will detail the consumables that any class should think of taking. A full list of consumables for every class will be extremely long. Before you enter any raid make sure you know what is expected of your class and what consumables to take! There are plenty of class specific guides for raiding on the net. It is very likely someone will be kind enough to make a class raiding guide for the Kronos forums.
Everyone in the raid should have 300 FR buffed and a stack or more of bandages. Everyone should have potions:
- Major Healing for just about anyone
- Major Mana if applicable
- Major Mana if applicable
Other consumables worth considering – These can be annoying to farm but can be an awesome asset:
- Food (+12 sta/spi, Nightfin Soup, etc.), Night Dragon's Breath and Whipper Root Tuber (since these don't share the potion cooldown)
- Flasks
- Blasted Lands Buffs
- Felwood Consumables
- Winterspring Juju’s
- Weapon Buffs
- Fire Protection Potion (If you haven’t been able to get your FA to 300 – if you have decent enough gear, this might not be necessary)
- Flasks
- Blasted Lands Buffs
- Felwood Consumables
- Winterspring Juju’s
- Weapon Buffs
- Fire Protection Potion (If you haven’t been able to get your FA to 300 – if you have decent enough gear, this might not be necessary)
A full list of all consumables that fall under the categories above can be found here: http://wiki.theamazonbasin.com/index.php/WoW_Raid_Consumables
2.6 Raid Group Composition
You will need to start thinking of who to take along in this raid. A balanced raid group will ideally have 5 of each class available to you, for a total of 40. There's some room to shuffle people around based on availability and spec, but try to stick to that as a general formula.
With MC being quite easy compared to other raids, I for one welcome the use of off-specs that are not labelled as ‘cookie cutter’. You might find some raid groups are not as welcoming to this idea for various reasons (due to efficiency, gear or achieving certain goals). But it is very possible to have a few people run a spec they are most comfortable with and will have the most fun with, and still easily finish this raid. However, the main issue with taking off-spec’s is gear allocation. You will find, especially the first couple of runs ever attempted by a new guild, any off-spec will not receive as much, or any, gear love as someone who rolled an efficient, raid purpose, spec. To expect otherwise is naïve and if you disagree with this or think of it unfair then any trouble or anguish you experience will be your own doing, and rightly so. Nonetheless, please play your class how you want to play it.
Once you have a good roster full or raiding peeps. Get all of these people attuned and geared, then find a time. You'll need several hours where everyone can be there to really progress at all; although the raid timer system means you don't need to run the entire instance in one sitting, you'll incur a substantial penalty by reclearing to whatever boss you left off on. Be sure to have a group or so in reserve in case of no-show’s, it’s a bit unfair to this reserve group, but they might get a chance nonetheless.
3.0 Trash Mobs
+ Means info on the mob.
- Means what this mob does during combat.
= The strategy involved in killing it/dealing with it.
3.1 Molten Giant
+Does NOT respawn back.
-Single target knockback.
-Area of Effect (AoE) stomp up to 8 targets
=Try and tank against a wall
=DPS after 2-3 sunders are up
3.2 Molten Destroyer
+Does NOT respawn back.
+Level 63.
+Bigger and Meaner version of the Molten Giant
-Single target attack, and attacks quickly.
-Hits tank for 700 - 800 damage.
-Massive trample - 1000 damage AoE attack
-Smash Attack - 1000 - 1100 damage against a tank.
-Knock down - Knocks a target down for a few seconds.
=When paired with a Molten Giant, kill Giant first, then Destroyer.
=Keep the Destroyer away from the main group.
=Newer groups that can't take the damage and afford the healing should do ranged damage only and keep the melee out of the fight.
3.3 Firelord
+150 minute static respawn.
+Immune to crowd control.
-Does 500 fire damage to a target.
-Can debuff somebody to increase fire damage taken.
-Ability that hits for 4000 damage + DoT which does 250 damage every 2 seconds + Silences.
-Summons Lava Spawns, which does ranged damage for 600, if left up, the spawn will split into 2, etc...
=DPS once tank has 2-3 sunders up
=Kill Lava Spawns as soon as they come out.
=Paladins and Priests dispel DoTS ASAP.
=Mages use Blizzard on the Lava Spawns
=If fighting 2 Firelords, get them together with the Lava Spawns and Blizzard AoE
Once you have killed a few Firelords it becomes very routine and boring.
3.3 Ancient Core Hounds
+18 minute respawn.
+Patroller.
+Immune to crowd control.
+They stop respawning once Magmadar dies.
-Frontal 180 degree bite attack.
-Long range Fire AoE that does 800 damage.
-In addition to this it will have one of six random AoE debuffs :
Ground Stomp - 5 second stun.
Ancient Dread - Slow spell casting and melee speed by 50% (Curse, can be removed)
Ancient Despair - 3 seconds of confusion (Magic, can be removed, although generally no one resists to dispel it.)
200 Fire resist Debuff (Magic, can be removed)
Withering Heat - Maximum hp reduced by 15% for 15 minutes (Magic, can be removed)
50% less int/spirit - (Magic, can be removed)
=Have one tank at the front, everybody else stays behind.
=Only AoE debuff worth dispelling is the 200 FR debuff, which can greatly increase the damge taken from his fire AoE.
=You should have another tank (with FR) ready to tank the dog. Since some of its abilities (like the fear and stun) cause the tank to temporarily lose aggro.
=Priests and Paladins must keep on eye on the type of debuffs and dispel when necessary.
Special Note for Ranged DPS: If you have points in any talents that increase the maximum range of your spells or attacks you may be able to avoid the AoE debuff. After the MT has established aggro, simply back up as far away from the hound as you can. Be careful doing this. If the MT is afflicted with Ancient Despair, the hound will run straight for you.
3.5 Core Hound Packs
+60 minute respawn.
+There are 5 packs of 5 leading up to Magmadar.
+Each hound in the pack must all be killed at the same time (within 10 seconds apart at the most), or they will be revived back!
-Hits tanks for about 300-400 damage.
-Frontal attack, which puts a DoT on target that does 50 damage every second for 30 seconds. This DoT can be stacked a total of 10 times for a total of 15,000 damage over 30 seconds.
=Get at least one Tank per hound and have all the tanks bunch them up. Try to turn so that the dog's head is facing outwards. This way, as few tanks as possible will likely be hit by the melee dot.
=Tanks should get the hounds to only face them, and away from the rest, to minimise melee DoT.
=DPS your hounds when 2 sunders are up. Make sure all 5 are up before using AoE attacks.
=Any person that does single target damage is also constantly looking for the dog with the highest HP to target.
=Healers are to remember to continue healing the tanks after combat, those stackable DoT's continue doing a lot of damage after the battle.
Be warned: If you pull too fast, i.e. having a dead pack on the ground while the next pull is coming in, the dead bodies can be reignited from the current aggroed pack!
3.6 Lava Surgers
+28 minute respawn.
+Stop respawning once Garr dies.
-Surge: Charges toward the player on his threat list who is farthest away for 1000 damage and will deal 100 damage to all players in melee range of that player and knocking them back.
=Banishable
=Tank facing away from the raid
=Tank and Spank – very easy fight.
3.7 Lava Annihilator
+120 minute respawn.
+Shares spawn points with Firelords
-Hits a tank for 900 - 1100 damage.
-Can be taunted, but won't hold aggro for long, randomly attacks targets which have generated threat
=Best way to fight these is EVERYONE stands at their feet and DPS it down. With MT establishing aggro before everyone engages.
=Tank can alternate between Taunt and Mocking Blow (note the cooldowns (CD) though)
3.8 Flame Imps
+7 minute respawn.
-Hits tanks for about 200.
-Small AoE fire attack that stacks up quite quickly.
=Warriors fight for aggro.
=Mages use blizzard, if they get aggro, use frost nova, then more AoEs.
=Move on quickly because these guys respawn fast!
3.9 Lava Packs
Consist of Lava Elements, Flamewalkers, and Firesworns. These you will encounter after Garr's lair when clearing to Baron/Shazz. When you pull these you need to banish the elemental and have 2 tanks pickup the Flamewalker and Firesworn. DPS them down and then kill the elementals. They have a very nasty AoE and some fun debuffs. FR is very much needed for Lava Packs.
These are probably the hardest Trash Mobs in MC. They can wipe a raid easily if they are not controlled right. So it is important to have some distance between the tanks and warlocks to the rest of the raid (at least 20 yards). Let the tanks get their targets, and face them away from raid, and only then start DPSing.
It is very important that the Firewalker and Flameguard AoEs not be allowed to overlap. The main tank is usually assigned to hold the Flameguard facing away and some distance beyond the party, while the off-tank holds the Firewalker.
The Firewalker is killed first, followed by the Flameguard, and finally each of the banished Lava Reavers or Lava Elementals. It is helpful to delay the banishing until 5-8 seconds after engaging the pack, so the reaver/elemental tanks have time to get aggro on their adds. If you fail to do this, the adds will come unsummoned and rampage through the raid until the tank grabs them again.
+120 minute respawn.
+4 different mob types.
+2 different groups:
Two Lava Elementals, Flameguard, Firewalker.
Or Lava Reaver, Flameguard, Firewalker.
Or Lava Reaver, Flameguard, Firewalker.
3.9.1 Lava Reaver
+Level 63.
+Has increased Resistances.
-Hits a tank for 600 - 800 damage.
-Cleaves for 600 - 700 damage.
=Banishable. Usually banished first while group focuses on the Flameguard and Firewalker.
=Their cleave is a chain cleave, which means it will hit anyone within appx. 5 yards of anyone else cleaved. As such, the melee DPS needs to be as far away from the tank as possible while DPSing these.
3.9.2 Lava Elemental
-Hits a tank for 600 - 800 damage.
-Strike - hits tank for 800 - 1000 damage
-Pyroclast Barrage - Deals 1500 fire damage over 6 seconds and stuns the target. This hits in a cone in front of the mob and is not dispellable
=Banishable. Usually banished first while group focuses on the Flameguard and Firewalker.
=Tank these while facing away from the group
=FR gear is advised when fighting these as Pyroclast Barrage and be devastating
3.9.3 Flameguard
-Continuous small AoE damage attack that also debuffs armour
-“Flamethrower" AoE that extends in front of it.
=Off Tanks should face this mob away from the raid
=Kill this mob after the Firewalker has been killed
3.9.4 Firewalker
+Most dangerous of the 4.
-Has a fire resist debuff.
-Fireball – hits for 3000 damage, can potentially cast very rapidly.
=Main Tank will aggro this mob
=DPS will target and kill this mob first. Warlocks will target this mob after they have banished their assigned elemental.
4.0 Boss Fights
4.1 Lucifron
This will be the first boss you encounter in MC. Popular opinion states that he is the second easiest boss in the raid. There is quite a bit of coordination required due to healing from AoE attacks, 2 different dispel types and 2 Flamewalker Protectors that have a mind control ability.
4.1.1 Attacks and Abilities
- Impending Doom
- Inflicts 2000 damage to nearby enemies after 10 sec.
- Dispel Type: Magic
- School: Shadow
- Radius: 40 yards
- Lucifron's Curse
- Curses nearby enemies, increasing the costs of their spells and abilities by 100% for 5 min. This cost increase applies to all spells and abilities, whether they cost mana, rage, or energy.
- Dispel Type: Curse
- School: Shadow
- Radius: 40 yards
- Shadow Shock
- Instantly lashes nearby enemies with dark magic, inflicting damage.
- School: Shadow
- Radius: 20 yards
Flamewaker Protectors
- These Guards that are pulled with Lucifron and has the ability to mind controls players
- Approximately 90,000 HP.
- Cleave
- Approximately 90,000 HP.
- Cleave
- Inflicts normal damage to an enemy and its nearest allies, affecting up to 5 targets.
- School: Physical
- Dominate Mind
- Takes control of a humanoid enemy for 15 sec.
- Dispel Type: Magic
- School: Shadow
NOTE: It is believed that if you pull the Flamewakers from Line-of-Sight of Lucifron, there will be no mind-control. Blizzard designed the battle area with this in mind, **hint: notice the small dug cave in the room.**
4.1.2 Strategies
In most cases, raids will first dispatch the first Core Hound Pack to give some room for the pullers and the main tank. It is important when Lucifron is pulled so that he does not come near the main raid group or there could be an instantaneous wipe. His guards have the ability to mind control, so it is sometimes easier to have one or two dummies move ahead of the main tank to suck up the mind control. Additionally, no one can move near the tunnel to the west, or the imps and surgers inside could chain aggro and wipe the raid.
Generally, two hunters will use one of their insta-cast shots to pull the Flamewalker Protectors, while the Main Tank must run up, tag, and pull Lucifron in the opposite direction of his guards. Generally the back cove is where the guards are pulled, while Lucifron is taken to another alcove on the east, far from the main raid. Each of the guards must then be picked up by two off tanks and dispatched accordingly before Lucifron is targeted.
Mages will not be contributing any large part of the DPS in this fight as they will be tied up with removing the curse that Lucifron casts on the raid every 15 seconds. Priests (and Paladins if Alliance) will also be tied up dispelling the Impending Doom debuff from healers, and especially the main tanks, and whoever becomes mind controlled. The core DPS for this fight therefore falls upon the rogues, hunters, and warlocks.
Once the two guards are defeated, all DPS will shift to Lucifron. Usually around 20-25%, it is safe for some of the mages to begin casting their nukes, depending on their mana and how quickly they decurse the raid.
Luci's debuffs have a range of 40 yards. It is possible for every healer (except the MT-decurser), and properly spec'ed hunters to stay out of Lucifron's curse-range, so with a good group you can minimize every curse-wave to about 10 raid members (melees). This makes the fight much easier and allows the mages to do damage too. You can also choose to keep only necessary players within the radius (healers, decursers, dispellers, tanks), and hold back the DPS players out of the range until Luci's mana is depleted. It takes a few minutes, but it saves the trouble of nearly wiping when the entire raid is bing hit by the curses and magic effects. It’s good to note that any ranged DPS that can attack at 41 yards through talents can exceed Luci's range and still DPS him down. They just have to be at their maximum range.
4.2 Magmadar
Favored among Ragnaros's pets, Mag is protected by the Flamewaker Lucifron and surrounded by vicious packs of ravenous hounds. He is the second raid boss encounter of the Molten Core and is guarding the Rune of Kress. This rune will need to be doused by a Quintessence (see Section 2.4) if you wish to summon Majordomo Executus.
4.2.1 Attacks and Abilities
- Magma Spit
[*=1]Magmadar spits out ‘globs’ of fire at random people. It stays on the ground and deals 93-107 Fire damage and an additional 75 Fire damage every 3 seconds for 30 seconds. Stacks up to 3 times.
[*=1]School: Fire
[*=1]Range: ?? yards
- Lava Breath
- Inflicts 1157 to 1343 damage to enemies in front of the caster.
- School: Fire
- Radius: 35 yards
- Panic (AoE Fear)
- Panics nearby enemies, causing them to flee in fear for 8 sec.
- Dispel Type: Magic
- School: Shadow
- Radius: 30 yard
- Lava Bomb
- Throws a Lava Bomb at an enemy, creating a fire that inflicts 3200 Fire damage over 8 sec.
- School: Fire
- Range: 100 yards
- Fire Radius: 5 yards
- Frenzy
[*=1]Every so often Magmadar will Frenzy.
[*=1]Frenzy massively increases his attack damage.
- Immolation
- Melee classes fighting Magmadar will experience minor immolation damage.
- Can be avoided by staying at max melee range.
4.2.2 Strategies
The main tank should pull Mag so that he is facing towards the main group of healers, hunters, and nukers. Maghas a frontal attack that should only hit the MT. To accomplish this, once the MT has aggro, the rest of the melee and the melee healers run around BEHIND Mag. Casters and the rest of the healers will be standing in front of Mag, but out of range of his frontal/fear attack. Here is the positioning:
T=Tank, M=Melee, N=Nukers, H=Healers. The green circle is Mag's fear range
Hunters must use Tranquilizing Shot (a learned skill that comes from a tome with a 100% drop rate from Lucifron) when he frenzies, they must pay attention to the order they use it in and whether it is a hit or a miss. The first few Magmadar fights will be tricky, since Tranq shot will often miss. Once a few hunters have it, however, they can set up a rotation so that if one person misses, someone else can back him up. All hunters should make macros which will say when you have casted tranq shot, and will also let the raid know if you have missed. During the first few fights when we only have one or 2 tranq shots, healers will have to pay special attention to when Tranq shot misses, since the MT will then require mad healing to stay alive.
Melee DPS should come in on the sides and behind Mag. They need to be sure to avoid the Immolate, by staying at max melee range, and avoid any ‘globs’. They will be responsible for removing themselves from battle and bandaging since they will be out of range of the healers. If Fear Ward is not available, the warrior can "stance dance" in and out of Berserker Stance in order to use Berserker's Rage about every 30 seconds to avoid being feared. It is important that the main tank doesn't get feared — otherwise, while aggro will no longer be lost, Magmadar will follow the fleeing tank and the healers will suddenly be in range of him, and it is unlikely that the raid group will recover.
A guild new to Magmadar may wish to have 2 groups of MT healers, only one of which is on the MT at a time. If the group that is actually healing the MT gets feared, the other group rushes in. My guild used this method until the healers became better at staying just out of AoE fear range. We found that 2–3 healers per group is enough so long as the hunters are quick with the tranq shots.
The BoJ setup method: The easiest way to control the encounter is having healers and ranged DPS classes outside the fear range from the start. The trick to this is setting up the pull. Have your main tank walk up to maximum bow range from Mag and stay there. Now have your healers adjust position so they are just in healing range of the main tank. Healing range is 40 yards, and AoE fear range is 30 yards, so this should be easy. (Hint: if you can cast dispel or cleanse on the main tank, you are too close.) Hunters and mages with extended range now move to the same radius as the healers, but may need to move in a little to get range once the encounter starts. The healers and ranged DPS should be in a semi-circle and spread out to reduce the chances of a multiple people being affected by a Magma spit puddle. Once the healers and ranged DPS are in position, the main tank pulls Magmadar with a bow/gun.
So, stay out of the fire globs that are put down by Magma Spit. Use Tranq shot to keep Magmadar calm, and have the MT stance dance to avoid being feared. Other than that, it's just DPS him down!
Last edited:
") . Play your character how you want to, whether it be with a non-raiding spec or with/without FR gear. I have run raids where majority of the raiders didn't have FR gear at all, and we cleared it in just as much time as a cautious raiding party.
. Play your character how you want to, whether it be with a non-raiding spec or with/without FR gear. I have run raids where majority of the raiders didn't have FR gear at all, and we cleared it in just as much time as a cautious raiding party.